

Fermented Garlic Dill Pickle Carrots Recipe
Fermenting carrots is a wonderful way to preserve them for long term enjoyment. Through the process of fermentation the flavor is transformed, yet the carrots keep their delightful crunch.
Enjoy these garlic dill carrot pickles as you would a traditional pickle; on the side of your sandwich or chopped up in tuna salad. Grate them over fresh mixed greens or add them as a garnish to a Bloody Mary.
Fermented Garlic Dill Carrot Pickles
Yield: 1 quart jar
Ingredients:
1 lb. fresh carrots
4 cloves garlic, crushed
½ tsp. whole peppercorns
1-2 sprigs of fresh dill or 1 tsp. dried dill weed
Optional for spice: 1 jalapeno (or hotter pepper of choice), sliced into quarters
Brine:
1 tbsp. coarse kosher salt, dissolved in 2 cups water
Directions
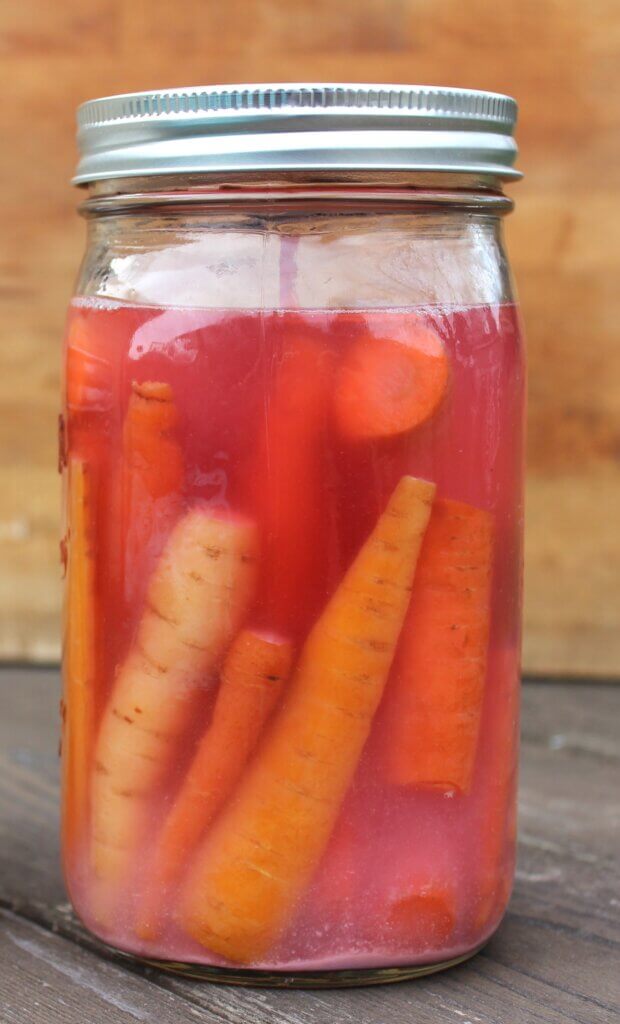
Wash and scrub carrots, trim off the ends. It’s up to your personal preference if you want to peel the carrots or leave the skin on. Leaving the skin on will aid in the fermentation process, though removing it won’t cause harm.
Lay a clean quart size mason canning jar horizontally next to the carrots and cut carrots so that they fit in the jar vertically, while leaving two inches of headspace (space from top of carrots to the rim of the jar). It is preferable to use thin to medium-sized carrots, though if your carrots are thick, I recommend cutting them in half or quartering them lengthwise. Try to use carrots uniform in size so that they ferment evenly.
To pack the jar, begin by adding the dill, peppercorns and garlic to the bottom of the jar and proceed to add the carrots. Carefully fit them in as snug as possible without bruising or breaking them. If you are adding hot peppers to this ferment, add them within the carrots.
Once the jar is completely filled with carrots, pour the brine mixture over the produce until the brine covers the carrots by at least a ½ inch. Leave at least one inch of headspace so that the ferment has room to bubble without overflowing.
If you have a small fermentation jar weight, add it to the jar to hold down the produce under the brine. Remove any small pieces of food that float up to the top of the brine, as anything above the brine will increase the risk of mold. Wipe off the rim of the jar with a clean dampened towel. Add the Mason jar canning lid and tightly screw on the ring.
Fermentation:
This is a 7-to-10-day ferment. Ferment at room temperature, ideally between 60-75°F (15-23°C) and keep out of direct sunlight.
Check on the ferment daily to make sure that the brine is covering all the produce. If any produce has floated above the brine level, use a clean utensil to push it back below the brine.
Burp the jar daily—unscrew the lid briefly and tighten it back on to allow any built-up gas to release.
Once fermentation is complete, transfer the jar into the refrigerator, with the brine and all.
Fermentation does not stop once the ferment is transferred to the refrigerator, however it does slow the process way down. The taste and texture will continue to change, therefore this ferment is best enjoyed within 12 months.
Side notes:
If you do not have a glass jar weight, you can improvise by using an easily removable small food-grade glass dish that fits inside the jar.
If you are unsure if your water is safe for fermentation, you can boil it and allow it to cool to room temperature before stirring in the salt to make your brine.
Through fermentation, the brine will become cloudy and you may see white sediment appear at the bottom of the jar or on the carrots, this is a normal part of the fermentation process.
This recipe has been adapted from Can It & Ferment It with permission from Skyhorse Publishing, Inc.
Stephanie Thurow is the author of Can It & Ferment It, WECK Small-Batch Preserving, WECK Home Preserving and co-author of Small-Scale Homesteading. She is a certified master food preserver, master gardener, writer and traditional living skills instructor. Find her online: @minnesotafromscratch
Photo credit: Stephanie Thurow
You may be interested in:
Tips for Growing Garlic (and a Recipe)
Plant garlic this fall and thank yourself later as you enjoy fresh pesto, quiches and other garlic-filled dishes next summer. Growing garlic is easy and fun….
Plant Profile: Dill
Once upon a time, I planted dill in my herb garden and it grew so tall and gorgeous that I couldn’t bear to harvest it….
Fermented Radish Salsa
Radishes are some of the first seeds I direct sow in spring. To me, they signify the kickoff of a new growing season. I really…