

Food Preservation Basics
When you dive into a new hobby or want to learn a new skill, the big question usually is, “How much will it cost to get started?” Luckily, water-bath canning won’t break the bank.
When I started canning, I had a big soup pot, a little canning rack I got at the hardware store and a dozen pint jars—that was all! Since then, I’ve learned which items are essential, what equipment is worth spending a little more on and what additions are optional but fun.
Essential Supplies for Canning and Food Preservation
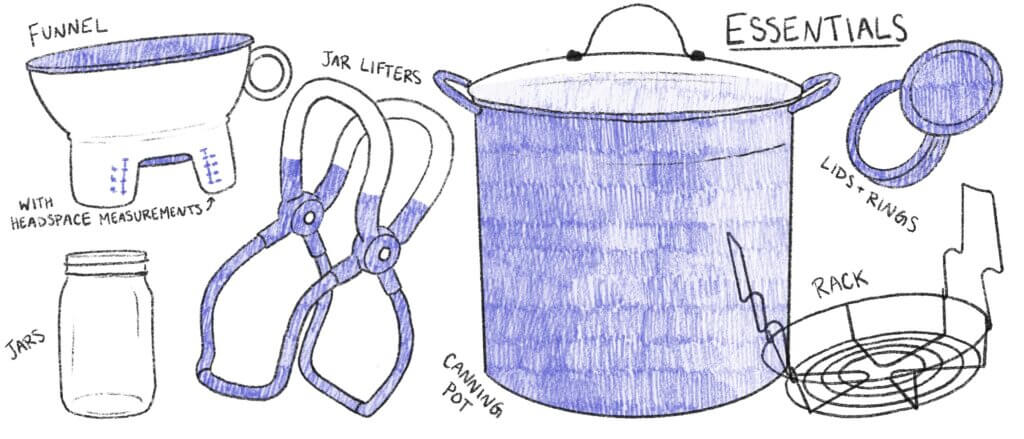
Pots
If you have a big soup pot, you might not need to purchase a new vessel just for canning. Yes, they sell “canning pots” but the only special thing about them is that the dimensions are made to fit quart jars (often seven at a time). If you already have a large stock pot, you just want to make sure the jars you’re using can be submerged 1 inch underwater.
If you want to purchase a pot just for canning, I always recommend stainless steel over enamel. One bump, drop or ding and an enamelware pot will almost immediately flake and rust. Stainless steel canning pots can withstand more wear and tear, and they often come with a glass lid, which is handy for visibility.
If you have an inkling you may be interested in pressure canning in the future, and you’re ready to make a larger financial leap, you can water-bath can in many pressure canners—you just treat them like a regular pot and don’t pressurize them.
Baskets + racks
Baskets and racks are essential because they keep jars from jostling on the bottom of your pot while water is boiling. Jars bouncing around in your pot lead to cracked jars and ruined food!
Baskets and racks come in many shapes, sizes and materials. Some have handles for lifting out of the pot, and some have divots for jars to sit in. Most canning pots come with a rack or basket that fits inside, but if you’re using a stock pot you already own, bring it with you when you shop for a canning rack to ensure it fits properly.
*While your grandparents or great-grandparents may have lined the bottom of their pots with rags to keep jars from breaking, this is not recommended. Rags move around in boiling water and release fibers into your water bath.
Jar lifters
One of the only specialty canning items you’ll need to purchase to start this hobby, jar lifters are the only safe tool for retrieving piping hot jars from boiling water. This isn’t an item you have to be super picky about, but if you want to be, I recommend lifters that are fully coated in plastic or silicone. Many lifters have coated handles and ends, but the metal in between can get very hot when frequently dipping into boiling water. Fully coated jar lifters stay cooler to the touch and also resist rusting.
Jars/lids/rings
The big brand names know what they’re doing in this department. Buying off-brand lids on the internet might be tempting, but I wouldn’t risk it. My best advice? Decide whether you’re team wide- or narrow-mouth early on, that way you don’t need to keep a constant inventory of two different types of lids. I’m team wide-mouth because I also like to use my jars as drinking glasses.
Funnels
Any canning funnel will do, but my favorites include headspace measurements so they can do double duty. It makes sense to include the headspace measuring tool in the thing you use when filling the jar! There are also separate headspace measuring tools (see “extras” section), but if I’m getting out a funnel anyway, I think it should do both jobs. Make sure your funnel fits the jars you will be using; some are made specifically for wide- or narrow-mouth jars.

Extras to Help with Canning and Food Preservation
Magnetic canning lid wand: Allows you to place lids on jars without using your hands. Nice, but not essential.
Labels/stickers: I tend to write the jar’s information (date and contents) directly on the lid since I won’t be using it again, but there are many nice label options out there that could make your jars more visually appealing.
Bubble remover and headspace tool: To be fully transparent, I don’t own one of these. I use my funnel for headspace measurements and a knife or chopstick to remove bubbles. I know some people who absolutely love this tool, so it might be right for you, too!
Digital scale: I use my digital scale almost every day. Since produce varies so much in size and weight, recipes often use weight measurements to ensure your product is safe to consume. A digital scale will also come in handy for baking and fermenting.
Disposable gloves: If you’re working with chilis, or even a lot of garlic or onions, a box of disposable gloves is crucial and will save you from pain and/or strong lingering smells.
Canning resources: University extensions often have wonderful canning and preserving resources. The National Center for Home Food Preservation, run by the University of Georgia, is another great reference, and they have a cookbook available for purchase online. For recipes, it is important to use resources that thoroughly test products before publishing. While it is enticing just to type what you want to make into a search engine, home canning is not the place to get experimental.
A note on stovetops: Before you start canning, note any cooktop limitations. Some ceramic or glass-top stoves have weight limits that a large water-bath canner may exceed. Some cooktops may even explicitly say they are unsafe for canning, and induction stoves require specific pots.

Taylor Tinkham is an editorial illustrator, Hennepin County master gardener volunteer and food preservation consultant living in south Minneapolis.
You may be interested in:
Day 30: Preserving the Harvest from Your Vegetable Garden
While it’s hard to imagine on a cold January day, there may come a time when you look at your vegetable garden and wonder what…
150 Tips: Preserving the Harvest
It’s that time of year when we’re buried in tomatoes, cucumber and green beans – yea! But how can we preserve produce flavor and vitamins…
Preserving the Harvest: The Options
With many garden crops ripening two or more weeks later than usual, the frenzy of preserving and storing has moved from August into September this…